
Welcome to the third episode of the Apache Ranger introduction. If you missed the last 2 episodes, please review them using below link:
- Introduction to Apache Ranger – Part I – Ranger vs Sentry
- Introduction to Apache Ranger – Part II – Architecture Overview
In this episode, I would like to introduce the Security Zone feature that is available in Ranger, how it works and how to configure it in Ranger Admin UI. This assumes that you have Apache Ranger installed already either via Ambari or Cloudera Manager 7.x. If you have not done so, please review below docs:
Let’s get started to understand what is Security Zone.
Security Zone is a feature that provides an ability in Ranger to separate resource policies into different zones. This helps to simplify administration of security policies, and also allows limited amount of policies to be checked when doing authorization against certain resources, because only policies under a particular zone that contains the requested resource are loaded and checked.
On top of that, it also enables multiple administrators to setup different policies, based on the zones that they are assigned to. For example, Sales admins can ONLY setup policies for resources under Sales Zone, where /sales directory in HDFS or sales database in Hive are assigned, and Development admins can ONLY setup policies for resources under Development Zone, where /dev directory in HDFS or dev database in Hive are assigned.
It was introduced into Ranger via upstream JIRA: RANGER-2232.
Adding new Security Zone is very straightforward, you can refer to Cloudera’s official documentation for details: Adding a Ranger security zone. I will not cover here again. However, one thing to keep in mind is that one resource can only be assigned to one security zone. If you try to create a new security zone with a resource that has been assigned to another zone, it will be rejected. See screenshot below:

There should not be any reason that you need to have same resource that maps to two different Zones, this violates the original design of the Security Zone feature.
Now I have created two Security Zones, let’s proceed to the next step:

In the following section, what I want to demonstrate here is below:
- You can still create policies for different resources than the one defined in the Security Zone that the policy is under
- The policies for certain resources will be ignored if they are defined under the Security Zone that is assigned to other resources
Below is the setup I have:
- Two zones, one “Sales” and another is “Development”
- “/sales” HDFS path is assigned to Sales Security Zone
- “/dev” HDFS path is assigned to Development Security Zone
- Two groups created: sales and dev
- Also two users created: user1 belongs to “sales” group and user2 belongs to “dev” group
$ groups user1
user1 : user1 sales

$ groups user2
user2 : user2 dev
Without any policies setup, each user won’t be able to access their department’s data:
$ sudo -u user1 hdfs dfs -mkdir /sales/user1
mkdir: Permission denied: user=user1, access=WRITE, inode="/sales":hdfs:supergroup:drwxr-xr-x

$ sudo -u user2 hdfs dfs -mkdir /dev/user2
mkdir: Permission denied: user=user2, access=WRITE, inode="/dev":hdfs:supergroup:drwxr-xr-x
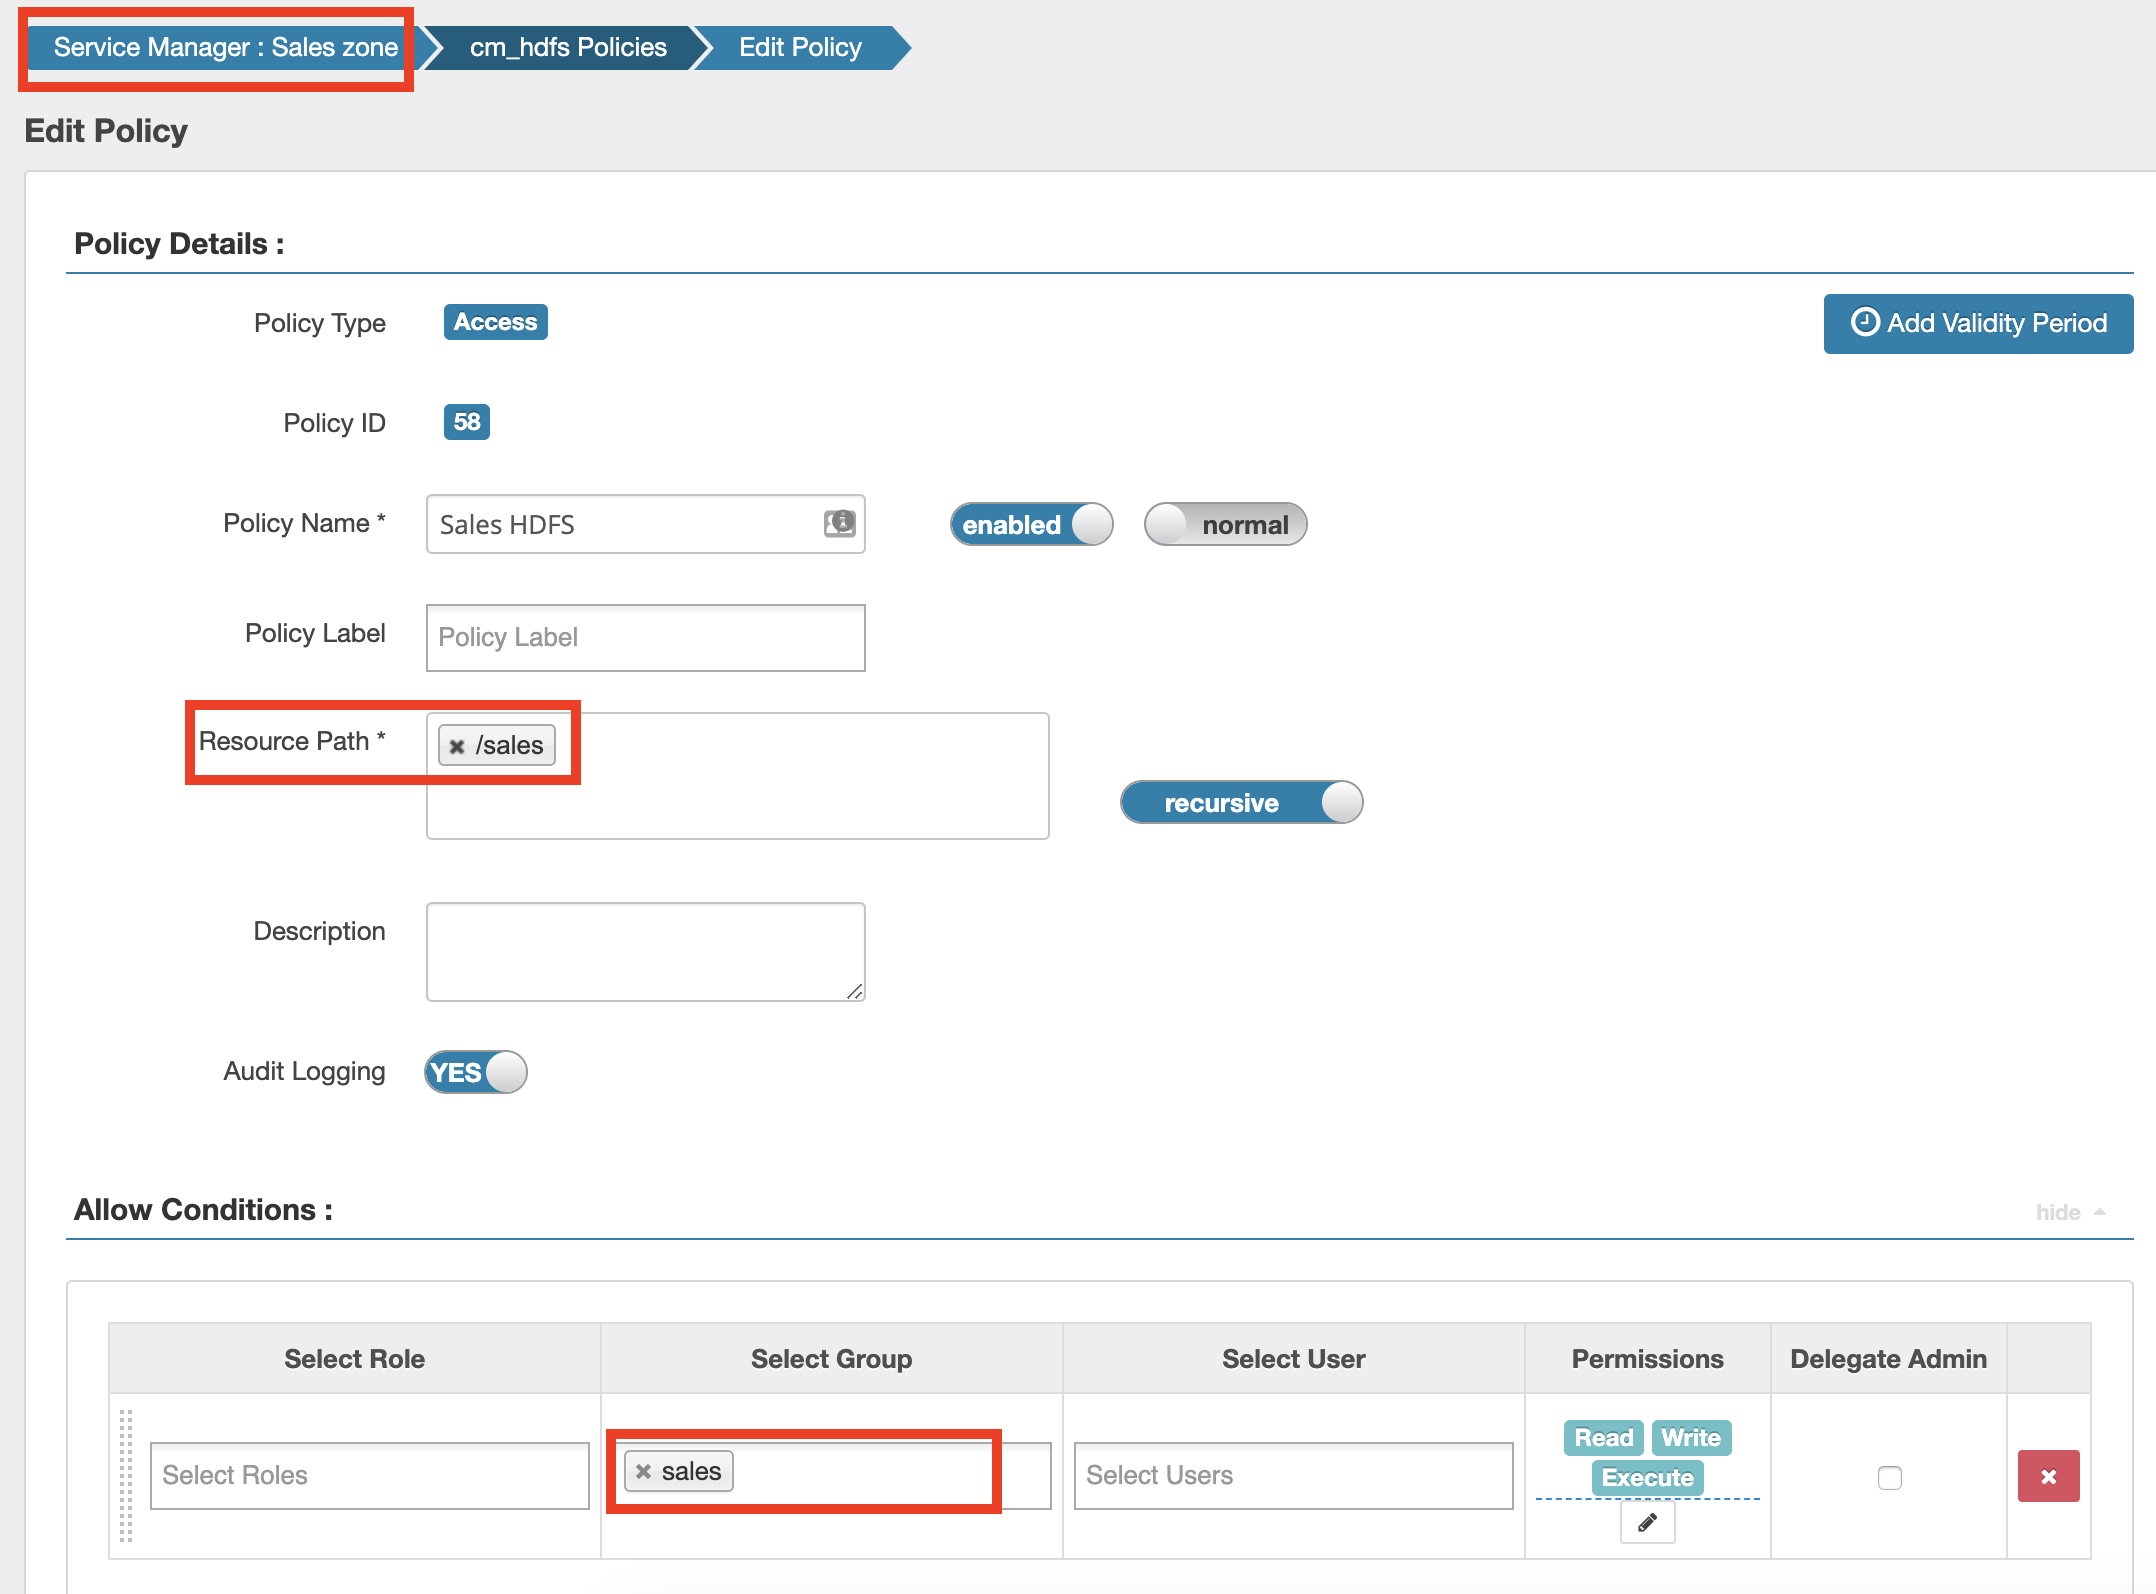
Again, creating Ranger policies is also straightforward, which is covered by Cloudera’s official documentation, please review: Configure a resource-based policies. I have gone ahead to create 2 polices, 1 under each zone for HDFS. Below are the examples, the Dev HDFS policy is created under Development Security Zone, and Sales HDFS policy is created under Sales Security Zone:

Now I can confirm that each user can create directories under their own department HDFS paths:
$ sudo -u user1 hdfs dfs -mkdir /sales/user1
$ sudo -u user1 hdfs dfs -ls /sales
Found 1 items
drwxr-xr-x   - user1 supergroup          0 2020-01-26 10:41 /sales/user1

$ sudo -u user2 hdfs dfs -mkdir /dev/user2
$ sudo -u user2 hdfs dfs -ls /dev
Found 1 items
drwxr-xr-x   - user2 supergroup          0 2020-01-26 10:42 /dev/user2
For simplicity, I have not enabled kerberos in my lab, so I just used “sudo -u {username}” to run commands as target user, just for the demostration.
Now, if you go to Audits page in Ranger Admin, you will be able to see the audit history for the list of commands I ran earlier. I have filtered out to show just for “user1”:

You can see that the first try to create path “/sales/user1” was Denied. Even though it did find out that the resource /sales was under Sales Zone, indicated by the last column, but we had not created a policy, hence Ranger did not apply any authorization, and fell back to HDFS ACL, indicated by column “Access Enforcer” with value “hadoop-acl”.
After I created the “Sales HDFS” policy to allow all users under “sales” group to be able to access /sales HDFS path, we can see that Ranger has taken over the authorization and granted “user1” to create /sales/user1 directory. We can also see that Ranger recorded the policy that it used to check during this process, indicated by first column with Policy ID of 58. Finally, it also granted permission for “user1” to perform “-ls” operation, as indicated by the first row in the screenshot above.
Now, I will try to create a new policy to allow user1 to access /dev HDFS path, but still under the Sales Zone, and see whether it will work. See the setup screenshot below:

I can confirm that the policy was saved successfully, but the access is still denied:
$ sudo -u user1 hdfs dfs -mkdir /dev/user1
mkdir: Permission denied: user=user1, access=WRITE, inode="/dev":hdfs:supergroup:drwxr-xr-x

You can see that, Ranger tried to check policies under Development Zone, nothing was found (Policy ID column was empty), because the policy we just created for such access was actually in another Zone, so it would be ignored and Range had to fall back to hadoop-acl.
So, when performing troubleshooting steps, it is very important to make sure that the policies are placed under the correct Security Zone. Always go to the Audit page in Ranger Admin to confirm that and check if any Ranger policy is applied.
One thing to note is that when no Security Zone is found based on the requested resource, Ranger will use the “Default” zone that is setup during the installation. This “Default” Zone has no name, but it is present in Security Zone’s table in Ranger’s backend database:
id          | 1
create_time | 2020-01-21 00:51:01.622843
update_time | 2020-01-21 00:51:01.622843
added_by_id | 1
upd_by_id   | 1
version     | 1
name        |
jsondata    |
description | Unzoned zone

id          | 2
create_time | 2020-01-25 00:56:00.276
update_time | 2020-01-25 00:56:00.283
added_by_id | 1
upd_by_id   | 1
version     | 1
name        | Sales
jsondata    | {"name":"Sales","services":{"cm_hdfs":{"resources":[{"path":["/sales"]}]},"cm_hive":{"resources":[{"database":["sales"],"column":["*"],"table":["*"]}]}},"tagServices":["cm_tag"],"adminUsers":["Eric Lin"],"adminUserGroups":[],"auditUsers":["Eric Lin"],"auditUserGroups":[],"description":"For Sales Department","id":-1,"isEnabled":true}
description | For Sales Department

id          | 3
create_time | 2020-01-25 01:02:28.233
update_time | 2020-01-25 01:02:28.234
added_by_id | 1
upd_by_id   | 1
version     | 1
name        | Development
jsondata    | {"name":"Development","services":{"cm_hdfs":{"resources":[{"path":["/dev"]}]},"cm_hive":{"resources":[{"database":["dev"],"column":["*"],"table":["*"]}]}},"tagServices":["cm_tag"],"adminUsers":["Eric Lin"],"adminUserGroups":[],"auditUsers":["admin"],"auditUserGroups":[],"description":"For Development department","id":-1,"isEnabled":true}
description | For Development department
You can see that a zone with “id” 1 but empty “name” is stored in “x_security_zone” table, which is used by Ranger Admin to display Security Zone information in the web UI. All policies that are not assigned to user created zones will be defaulted to this zone. This means for any resources that does not match any zones, Ranger will retrieve all policies that are assigned to this default zone for authorization process.
This concludes the third episode of my Apache Ranger series. Stay tuned for more to come.
Thanks for reading.
![]()