
Welcome again to the new episode of my Apache Ranger introduction. In the last 3 posts, I have covered why Ranger was chosen as the replacement for Sentry, the basic architecture and the new Security Zone feature that was introduced since Ranger 2.0. I have been asked by my audience who are interested on how Tag Based policy works and how it differs from Resource Based policies. So I have decided to give a quick introduction to this topic with some examples.
Firstly, if you have missed the last 3 posts, please check them out using below links:
- Introduction to Apache Ranger – Part I – Ranger vs Sentry
- Introduction to Apache Ranger – Part II – Architecture Overview
- Introduction to Apache Ranger – Part III – Security Zone
Now, in order to introduce Tag Based policies in Ranger, we need to understand what is Apache Atlas, because Ranger relies on Atlas to get metadata information about Tags before it can decide how to apply policies.
So, what is Apache Atlas? To quote from Apache’s official site:
Atlas is a scalable and extensible set of core foundational governance services – enabling enterprises to effectively and efficiently meet their compliance requirements within Hadoop and allows integration with the whole enterprise data ecosystem.
Apache Atlas provides open metadata management and governance capabilities for organizations to build a catalog of their data assets, classify and govern these assets and provide collaboration capabilities around these data assets for data scientists, analysts and the data governance team.
It provides the following main features:
- Metadata types & instances
- Classification
- Lineage
- Search/Discovery
- Security & Data Masking
Where the first two are the main features that Ranger needs. We will see that more later in the post in my example. I suggest you to spend a bit of time go through the upstream documentation to get some basic understanding, however, no need to go into too much detail.
Now we have some idea on what Atlas is, let’s get back to Resource and Tag Based policies in Ranger. For Resource Based Policy, I think it is pretty straightforward. It is basically a policy that you define based on resource, which can be Hive table, HDFS path, Kafka topic etc. This will be covered in the example I show later.
For Tag Based Policy, it is not as straightforward, and I can summarize its main features in below bullet points:
- Separation of resource-classification from access-authorization
- One policy can apply to resources from HDFS, Hive, Kafka etc, no need to update individual resources
- Tags (classifications) are created in Atlas and attached to metadata (column, table, HDFS path etc)
- Ranger TagSync (consumer) can be used to synchronize the tag store with Apache Atlas (producer) via Kafka (topic name ATLAS_ENTITIES)
- Plugin of each services saves Tags info into policyCache locally for fast retrieval
Example worths a thousand words, so let me run through a very basic example to demonstrate how the Resource and Tag Based policy work in Ranger. We will start with Resource Based Policy to setup some rules to stop users from accessing certain columns from a table, and then use Tag Based Policy to turn the access ON for certain users but not for others.
Firstly, I create a student table with following fields:
CREATE TABLE student (
  id int,
  name string,
  age int,
  address string,
  dob date
);
Then inserted a few records:
INSERT INTO student VALUES
  (1, "Student 1", 21, "Address for Student 1", '2000-01-01'),
  (2, "Student 1", 22, "Address for Student 2", '2000-01-02'),
  (3, "Student 1", 23, "Address for Student 3", '2000-01-03'),
  (4, "Student 1", 24, "Address for Student 4", '2000-01-04'),
  (5, "Student 1", 25, "Address for Student 5", '2000-01-05');
Since i set the table under “default” database, and by default Ranger will allow public access to all tables under “default” database via a policy called “default database tables columns”:

This means my setup users “user1” and “user2” have full access to the table automatically:

So far so good. Now I am going to disable this default policy, and create a new policy that will restrict access to both “address” and “dob” columns, because I do not want everyone to be able to see all students’ address and when they were born.
To create a Resource Based Policy, go to Access Manager > Resource Based Policies, select correct Security Zone that is assigned to the resource, then click on Hive repository and “New Policy”. The new PII Example Policy looks like below:


You might have noticed that I have selected “exclude” for the “address” and “dob” columns. This allows me to only define the list of columns that I want to exclude, and it is useful in the case when the table in question has many many columns. In my case, I could also define to “include” the other three columns, the end result will be the same.
Now, if I want to “SELECT *” or any query that will touch either “address” or “dob” columns, access will be denied:

So, up to this point, I have used Resource Based Policies to setup a table that will hide two columns to both “user1” and “user2” users, because those two columns are considered as PII information and we do not want everyone to be able to access them, pretty straightforward so far. In the following steps, I will switch to use Tag Based policies to turn ON the access to “user1” only, because “user1” has been promoted and is required to access ALL student information in order to perform his/her duty.
Initially, Hive tables might not have been imported into Atlas’ metadata system, this might be because you have setup Atlas after Hive. To trigger the initial import, you can run below script:
$ bash /opt/cloudera/parcels/CDH/lib/atlas/hook-bin/import-hive.sh
Using Hive configuration directory [/etc/hive/conf]
/etc/hive/conf:/opt/cloudera/parcels/CDH-7.0.3-1.cdh7.0.3.p0.1635019/lib/hadoop/libexec/../../hadoop/lib/*:/opt/cloudera/parcels/CDH-7.0.3-1.cdh7.0.3.p0.1635019/lib/hadoop/libexec/../../hadoop/.//*:/opt/cloudera/parcels/CDH-7.0.3-1.cdh7.0.3.p0.1635019/lib/hadoop/libexec/../../hadoop-hdfs/./:/opt/cloudera/parcels/CDH-7.0.3-1.cdh7.0.3.p0.1635019/lib/hadoop/libexec/../../hadoop-hdfs/lib/*:/opt/cloudera/parcels/CDH-7.0.3-1.cdh7.0.3.p0.1635019/lib/hadoop/libexec/../../hadoop-hdfs/.//*:/opt/cloudera/parcels/CDH/lib/hadoop-mapreduce/.//*:/opt/cloudera/parcels/CDH-7.0.3-1.cdh7.0.3.p0.1635019/lib/hadoop/libexec/../../hadoop-yarn/./:/opt/cloudera/parcels/CDH-7.0.3-1.cdh7.0.3.p0.1635019/lib/hadoop/libexec/../../hadoop-yarn/lib/*:/opt/cloudera/parcels/CDH-7.0.3-1.cdh7.0.3.p0.1635019/lib/hadoop/libexec/../../hadoop-yarn/.//*
Log file for import is /opt/cloudera/parcels/CDH-7.0.3-1.cdh7.0.3.p0.1635019/lib/atlas/logs/import-hive.log
SLF4J: Class path contains multiple SLF4J bindings.
SLF4J: Found binding in [jar:file:/opt/cloudera/parcels/CDH-7.0.3-1.cdh7.0.3.p0.1635019/jars/log4j-slf4j-impl-2.10.0.jar!/org/slf4j/impl/StaticLoggerBinder.class]
SLF4J: Found binding in [jar:file:/opt/cloudera/parcels/CDH-7.0.3-1.cdh7.0.3.p0.1635019/jars/slf4j-log4j12-1.7.25.jar!/org/slf4j/impl/StaticLoggerBinder.class]
SLF4J: See http://www.slf4j.org/codes.html#multiple_bindings for an explanation.
SLF4J: Actual binding is of type [org.apache.logging.slf4j.Log4jLoggerFactory]
ERROR StatusLogger No log4j2 configuration file found. Using default configuration: logging only errors to the console. Set system property 'log4j2.debug' to show Log4j2 internal initialization logging.
Enter username for atlas :- admin
Enter password for atlas :-
Hive Meta Data imported successfully!!!
Upon prompting for Atlas username and password, just do so and wait for it to finish. I am using CDP here, which is the latest version of Cloudera stack. If you still use HDP version, the script is under below path instead:
/usr/hdp/current/atlas-server/hook-bin/import-hive.sh
Just run in the same way as above.
Once import is done, you can login and search “student” table from
the left side navigation panel, it looks something like below:

However, what we need to do first is to create a Classification, it is available just next to the “Search” menu on the left side panel, click through it and then the + sign, enter below information:

Now we have created the Tag/Classification, let’s get back to the “student” table and add the Classification to the columns that we identify as PII, namely “address” and “dob”. Simply search “student” again and then click through the “student” link in the result returned. Don’t worry about other information, just go straight to the “Schema” tab:

Then click the + button for both “address” and “dob” columns, select PII classification, and then click “Add” button:

After it is done, the page should look something similar to what I have below:

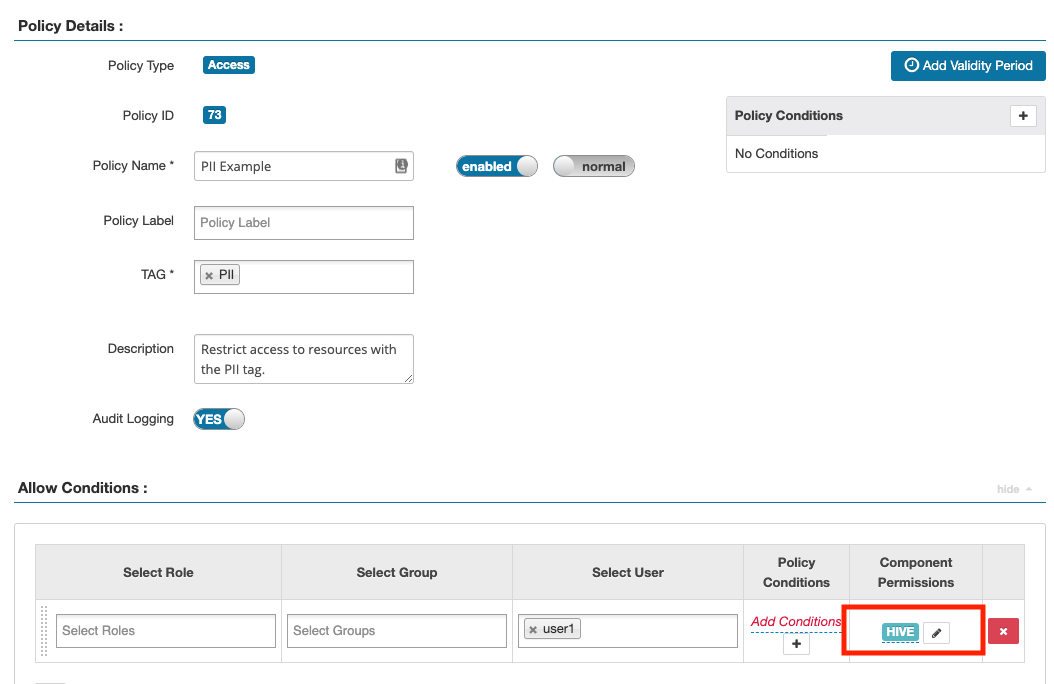
This concludes the setup on the Atlas side, where we have enabled PII Tag/Classification to both “address” and “dob” columns. Now it is time to setup the Tag Based Policy in Ranger Web UI. Go to Ranger > Access Manager > Tag Based Policies, make sure you are under the correct Security Zone, click through “cm_tag”, which should be created automatically as part of setup, but the name might be slightly different, then “Add New Policy”:

Add “user1” to “Select User” column under “Allow Conditions”:

Under Component Permissions, choose Hive service with “SELECT” privilege:

After above change, wait for a few seconds for Ranger to sync the changes, and then run the query again for “user1”, the query for “address” and “dob” will now be allowed:

And we can also confirm that access for “user2” is still restricted:

Up to this point, we have concluded the full setup for the student table to allow user1 to be able to access all data, but user2 is partially restricted via both Resource and Tag Based Policies. To further demonstrate the power of Tag Based Policies, I will continue to create another table called “student_result” which should be fully restricted, however, no further new policies are needed, we simply need to make some small changes in Atlas.
Let me create this new table:
CREATE TABLE student_result (
  id int,
  student_id int,
  subject string,
  score int
);
Wait for the metadata to be synced to Atlas and confirm by logging into Atlas and search for “student_result” table:

Now, we are going to apply the “PII” classification at the table level for “student_result”, just click on the “Classification” tab showed from above screenshot, then + button and select “PII”, the result looks like below:

After the update in Atlas is synced to Ranger via TagSync, and HiveServer2 client updates its local cache, we can run the same query again using both users, we can confirm that user2 does not have access but user1 does, because “user1” was granted access to PII tag, which was assigned to student_result at table level:
$ kinit user1
0: jdbc:hive2://hive2.com>select * from student_result;
+--------------------+----------------------------+-------------------------+-----------------------+
| student_result.id  | student_result.student_id  | student_result.subject  | student_result.score  |
+--------------------+----------------------------+-------------------------+-----------------------+
| 1                  | 1                          | Math                    | 80                    |
+--------------------+----------------------------+-------------------------+-----------------------+

$ kinit user2
0: jdbc:hive2://hive2.com> select * from student_result;
Error: Error while compiling statement: FAILED: HiveAccessControlException Permission denied: user [user2] does not have [SELECT] privilege on [default/student_result/*] (state=42000,code=40000)
You can see that we did not create any new policies to grant access to new table “student_result”, we simply attached Tags/Classifications to the target table, and the same Tag Policy we defined in Ranger will take effect.
So far, we have limited to the access to Hive, now let’s also apply the same Tag Policy to a HDFS path to show that the same also applies. Let me create a /data/pii directory using “hdfs” super user:
kinit hdfs
hdfs dfs -mkdir /data/pii
Confirm that both “user1” and “user2” do not have write access to the new directory:
[user1@c2393-node2 ~]$ hdfs dfs -mkdir /data/pii/user1
mkdir: Permission denied: user=user1, access=WRITE, inode="/data/pii":hdfs:hdfs:drwxr-xr-x

[user2@c2393-node3 ~]$ hdfs dfs -mkdir /data/pii/user2
mkdir: Permission denied: user=user2, access=WRITE, inode="/data/pii":hdfs:hdfs:drwxr-xr-x
Keep in mind that currently I do not think the HDFS paths will be synced to Atlas automatically, so we need to manually create the /data/pii path in Atlas web UI. Go to home page and click on “Create New Entity” link:


Then enter the short version of path for Name field, full version of path, that includes NameNode/Namespace with hdfs:// prefix for Path field, and add “@{clustername}” to uniquely identify this entity in Atlas for QualifiedName. Please note that QualifiedName must be unique. Once saved, go to the Classification tab for this entity and add PII under “Classifications” menu as we have done before. Once done, it should look something like below:

Remember that when we setup the Tag Policy for PII, we only selected “Hive” service on the policy creation page. So we need to go back to the Tag Policy that we created before and update it to include “HDFS” service:

After saved, we should be able to see “HDFS” under Component Permissions column under Allow Conditions section:

One more thing to keep in mind is that we need to make sure the Tag Policy we created should match the resource that is assigned to a Security Zone. In our case, I did not set it up under any security zones, so it is OK. However, in real life scenario, just to double check that and make sure the HDFS path is covered by the resource that is assigned to the Security Zone that the Tag Policy belongs to.
Once done, perform the “mkdir” operation again to confirm that “user1” now has access to create sub folders under /data/pii, but “user2” still can’t:
$ kinit user1
$ hdfs dfs -mkdir /data/pii/user1
$ hdfs dfs -ls /data/pii
Found 3 items
drwxr-xr-x   - user1 hdfs          0 2020-03-25 22:01 /data/pii/user1

$ kinit user2
$ hdfs dfs -mkdir /data/pii/user2
mkdir: Permission denied: user=user2, access=WRITE, inode="/data/pii":hdfs:hdfs:drwxr-xr-x
Again, we did not create any new Ranger policies, all we did was
- Update existing Tag Policy to include HDFS service
- Create a new HDFS entity in Atlas and attach PII Tag
This minimizes the number of policies that we need to keep and makes the system easier to maintain. If you are interested, you can continue the exercise to apply the same Tag to HBase, Kafka etc to play around with Ranger.
Final note, please be aware that Tag Based Policies will be evaluated before Resource Based Policies, so during troubleshooting, make sure that you perform the correct order of checking for your analysis. Please review below chart:

This concludes my post for the introduction of Tag vs Resource based policies. If you have any thoughts, please add your comments below.
![]()